 |
 |
 |
Your permission
to e-mail customers can take many forms, from
a handshake to a passed-along business card.
But why not give them a simple way to sign up
on your Web site? Benchmark E-mail helps you
do this with our built-in ListBuilder feature.
Use our ListBuilder tool and create a button
and a sign up page that captures customer info
in a snap. A typical ListBuilder button looks
like this:

Once a
customer clicks the button, they’re taken
to another page to enter their e-mail address,
name, or other info. When they click the submit
button, their info is added to your Benchmark
E-mail contact list. Here are the steps to create
your Benchmark E-mail ListBuilder:
|
|
 |
 |
Sign in to your Benchmark E-mail account,
Click on the E-mail Lists tab, and click
on ListBuilder sub tab. Click on the Create
ListBuilder button.
On the next page, name your ListBuilder.
Your ListBuilder might be named, for example,
"newsletter sign up" or "member
sign up". In the ListBuilder Description
box, give a brief synopsis of what the
ListBuilder is for, including which page
you’ll place it on (your home page,
for example). Also, choose your contact
list. Once your customers sign up, they’ll
automatically be added to the list you
prefer. |
 |
|
 |
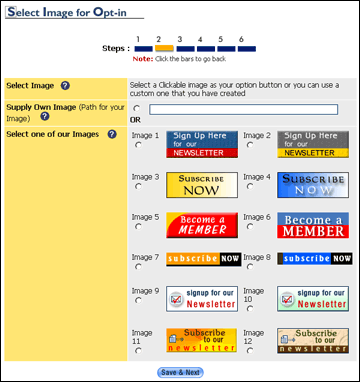
In
this step, the Select Image
for Opt-In page, you’ll
choose the button customers will click
on to sign up. Benchmark has 12 to choose
from. You may also decide to use your
own. If so, fill in the field that directs
where the image can be found (for example,
www.mystuff.com/list builder image).

|
 |
|
 |
What
would you like your customers to submit
when they sign up? On the Your ListBuilder
Form page, you’ll decide.
At the minimum, it will be their e-mail
address. You may also want them to submit
their first name or last name. Check the
box for each field you’d like them
to fill in. If you click on the boxes in
the right side column, it makes these fields
mandatory and they won’t be able to
sign up unless they fill in these fields.
If you fail to choose which type of e-mail
your customers prefer, HTML or text, our
system will find out for you when it sends
your customers an e-mail. |
 |
|
 |
Now
you’re in the Label your ListBuilder
Form page. If you’d like
customers to fill in their e-mail, first
name and last name, simply leave these fields
as they are and press Save & Next to
move to your next step. |
 |
|
 |
You
should now be on our Your Subscription
Method page. You have two options:
single opt-in and double opt-in. Single
opt-in assumes that if your customers
have used your ListBuilder, you already
have permission to send them e-mails.
Double opt-in sends your customers a second
step confirmation e-mail even after they
use your ListBuilder. Your best bet is
double opt-in. This method makes absolutely
certain that the person wants to hear
from you. With single opt-in, there’s
always a chance someone else signed that
person up without their knowledge.
You might want to set up an autoresponder
e-mail for single opt-in customers, which
may say something simple like "Thank
you for signing up for my newsletter".
For double opt-in, you’ll need to
enter the text for that second confirmation
e-mail. It may say "Please confirm
that you’ve signed up for my newsletter".
A confirmation link will be placed at
the top of this e-mail so your customers
can confirm, once again, that they’d
like to receive e-mail from you.

|
 |
|
 |
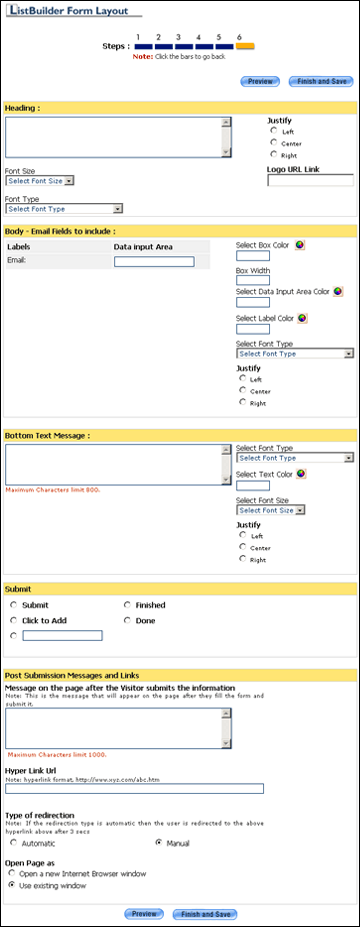
Now
you should be on the ListBuilder
Form Layout page, where you design
the page where customers fill in their
info. This page shows up after customers
click on your ListBuilder button. You
can choose colors and placement, as well
as the size and dimensions of the fill-in
boxes. Hit the preview button to make
sure you like your design. At the bottom,
you can fill in the text customers will
see after they submit their info. You
may choose a simple message like "Thank
You".

A
preview of your ListBuilder Form Layout
may look something like this:

|
 |
|
 |
In
the last page, the ListBuilder Completed
page, you’ll see a summary
of what you’ve done. Once you reach
this page, you’ll receive an e-mail
with detailed instructions on how to place
your ListBuilder on your page, as well as
the code that enables you to do so. If you
work with a Webmaster, pass this info along
to them. If you’d like to do it yourself,
follow the instructions.
If you’d like more information on
this feature, contact
us. |
 |
|
|
Warm
Regards.
Victor
Benchmarkemail.com
Click
here to view back issues of Benchmarkemail
I hope you have found the above information helpful. You
can email me at service@bmesrv.com
or visit me on the online chat between 9:30-4:30 EST.
Would you like more
information on email
marketing?
|
|
 |
|
 |
|

